Hi guys I just wanted to sit down, and wright to you guys and explain how to get better at drawing. I am going to be using eight tricks that worked for me.
Number 1: Practice. I cant say this enough you have to practice drawing everyday, to get better. Even if its just a few sketches a day if you want to get good at drawing you have to practice.
Number 2: Use photos references. It is very hard to draw pictures well just using your mind. Have photo references of the picture you are drawing it will help you a lot.
Number 3: Study on one thing you like. If you like to draw animals stick with drawing animals for a while, and when you are ready to start a knew topic stay on that for a while. Don't just keep drawing new pictures you have to get used to the topic of art you are doing.
Number 4: Think of what your drawing as an abstract arrangement of different shapes it will help you in the long run.
Number 5: Make sure you know how to contrast your drawing knowing what is bright or dark.
Number 6: Have good art supplies. Don't just go to any craft store or online store and get art supplies because those aren't the best. Get your equipment form a store that sells them for a living that how you know they are good.
Number 7: Know what perspective your drawing at. You'll have to know the difference between first person second and third.
Number 8: Do not compare you art to other peoples art if it makes you feel bad. This will make you stress out, and even sometimes make your art look even worse. If you compare your art to someone that is better then you, and you feel sad about it you have to stop doing that.
Sunday, February 28, 2016

Sunday, January 31, 2016
Origami Blog: How to make an Origami Flapping Bird
Step 1: First get a normal sheet of printer paper and make it into a square piece of paper. If you don't know how to make the printer paper square check back on one of my older origami blogs. Fold the square piece of paper in half both ways. Your paper should have a plus going through the paper, and a a line going through the middle. Now turn the paper so it looks like a diamond, and do a reverse fold going inward. This will take out on of the corners in the paper. Now do the same thing to the other corner.


Seventh Drawing Blog: How to Draw a Dog part 1
Step 1: Draw a circle. Now you are going to draw the dogs snout. Make sure the snout has a good curve, to make it resemble a dog's nose. Start it in the middle of the circle and make it end at the bottom of the circle. Draw rounded triangles right above the snout, making the eyes. Draw an ear on both sides of the dogs face. The ears should look like a rounded triangle flopped over. Finally under the snout draw the neck draw one line, making half of the neck. then to the left of the ears draw a line going towards the left finishing the neck.


Sunday, January 17, 2016
Starting up Blogs Again
Hello everybody I just wanted to quickly talk to you guys about what has been happening the last three weeks and why I haven't been putting up blogs. First I want to start up by saying Happy New Years and have the rest of your year great. Now I want to talk about why I haven't been putting blogs. During the last three weeks I have been in winter break, and over that time I couldn't find to much time to write or draw. I have been drawing a few sketches, and are ready to share them with you guys in future blogs. Also during winter break I went to Florida. At Florida I was always doing something, and there was no electronics at the hotel my family and I stayed at except a TV. This made it so I wasn't able to post anything. My Florida was amazing though we went all over Universal Studios and Disney World. That is what happened to me for the past three weeks and weekly blogs will be starting up next week.
Sunday, December 6, 2015
Just Talking
Hey guys! Its Minas and today I just want to talk about things I like, and how I got into drawings.
How I got into drawings: I got into drawing in the age of 8, and now I am currently 13. Which means I have been drawing for 5 years. I got into drawing when I went to my cousins house one day, and saw my cousin drawing. Now my cousin is going towards a career of being an artist and that really inspired me to draw. I thought I would be able to draw like him when I started, but I didn't and I drew terribly. At that time I didn't think I would get better, but then my cousin started giving tips, and I started to draw more often. Now back in present times I am drawing whenever I have free time to get better. that is how I got into drawing, and how I became to draw like how I do today.
Things that I like: Over the 13 years of my life I have grown an interest in many things I am here with you know to talk about them. As you all know my number one favorite thing to do is draw. It is a perfect way to show emotions, and use your free time. I love all kinds of art realistic, fiction, anime. These topics all have an interesting drawing perspective to them, that's why I like them. Going outside the art topic the other things I like, are video games and books. Even though i don't read books that often I love to sit down on some days and just read a good book. I also don't play video games that often usually I'll just play a game with my friends for a little then get off. Even after all of those things there is one thing that makes me even happier then drawing, my family. My family make my life happy, always encouraging me to do thing I didn't think I can. They always give me there support and love, and that's why they make me happy. They are the best, and I love them very much.
I hope you enjoyed my little blog about my life, and drawings will be back next week.
How I got into drawings: I got into drawing in the age of 8, and now I am currently 13. Which means I have been drawing for 5 years. I got into drawing when I went to my cousins house one day, and saw my cousin drawing. Now my cousin is going towards a career of being an artist and that really inspired me to draw. I thought I would be able to draw like him when I started, but I didn't and I drew terribly. At that time I didn't think I would get better, but then my cousin started giving tips, and I started to draw more often. Now back in present times I am drawing whenever I have free time to get better. that is how I got into drawing, and how I became to draw like how I do today.
Things that I like: Over the 13 years of my life I have grown an interest in many things I am here with you know to talk about them. As you all know my number one favorite thing to do is draw. It is a perfect way to show emotions, and use your free time. I love all kinds of art realistic, fiction, anime. These topics all have an interesting drawing perspective to them, that's why I like them. Going outside the art topic the other things I like, are video games and books. Even though i don't read books that often I love to sit down on some days and just read a good book. I also don't play video games that often usually I'll just play a game with my friends for a little then get off. Even after all of those things there is one thing that makes me even happier then drawing, my family. My family make my life happy, always encouraging me to do thing I didn't think I can. They always give me there support and love, and that's why they make me happy. They are the best, and I love them very much.
I hope you enjoyed my little blog about my life, and drawings will be back next week.
Sunday, November 15, 2015
Sixth Drawing Blog: How to Draw a Wolf
Step 1: Start with two six centimeter boxes, one on top of the other. Draw two small circles in the top corners of the bottom box. Draw a small triangle coming from the outside of the eye. This is the black line that helps the wolf not get dust into its eyes. Let there be a small curve at the end of this triangle, and then do this all to the other eye. Now draw a small oval in the center of the wolf's eye this will be the pupil. Shade the pupil in lightly, but don't shade the top of the oval. Draw a small semi-oval at the bottom middle of the square. Now finish the semi-oval by drawing the bottom part more circular then an oval. Draw a line from the bottom of the oval, and make it reach the bottom line of the square. To draw the nostrils of the nose have a circle right next to the line, and have a small line going to the side of the wolf's nose.
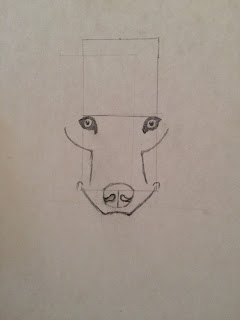
Step 2: Draw a small curved line under the eye, and make it go to the side of the nose. Do this also to the other side. Under the nose draw a small frowning mouth about the size of the nose. Then on each side, curve a line upwards so the line meets up with the line that we put under the eyes. Draw a small curve at the end of the lines, then make a smiling mouth right under it. This will make the wolf's mouth. Now, draw a six centimeter line going outwards on each side of the top box. Then draw a line downwards from those lines to make another box. Draw a big curve around the top of the wolf's head. The curves should be close to touching the sides of the new box we just made. On each side of the head draw a protruding triangular piece. This will be the wolf's ears. On the bottom sides of the ears draw multiple lines going outwards. This will be the fur.

Step 3: Draw fur on the top of the wolf's head between the ears. Start drawing circles of fur around the wolf's eyes. Between those curves of fur start drawing lines going upwards in all directions. continue drawing the fur on the bottoms of the ears, and make them go down towards the nose. At the line under the wolf's eyes draw lines going towards the center of wolf's face. Draw a circle of fur around the wolf's eye. On the ears of the wolf draw dark but small lines. Darken the fur that is between the ears. Draw a line of dark fur in the center of the wolf's ear. Now you are going to darken the wolf's eyes and nostrils. You are now going to shade in the nose, and add more fur between the eyes of the wolf. Add some fur around the mouth and connect it up with the fur next to the eyes. Now draw fur coming from the eyes and the center of the wolf's face, make it meet up with the edges of the wolf's face. Darken some of the lines on the wolf, and darken the top of his head. In the area around his cheeks don't shade anything; leave it white. Darken most of the end lines on the wolf. then finally make a body by drawing fur going towards the right, and connecting it to the face. That was how I draw a wolf. I hope you enjoyed it.


Step 2: Draw a small curved line under the eye, and make it go to the side of the nose. Do this also to the other side. Under the nose draw a small frowning mouth about the size of the nose. Then on each side, curve a line upwards so the line meets up with the line that we put under the eyes. Draw a small curve at the end of the lines, then make a smiling mouth right under it. This will make the wolf's mouth. Now, draw a six centimeter line going outwards on each side of the top box. Then draw a line downwards from those lines to make another box. Draw a big curve around the top of the wolf's head. The curves should be close to touching the sides of the new box we just made. On each side of the head draw a protruding triangular piece. This will be the wolf's ears. On the bottom sides of the ears draw multiple lines going outwards. This will be the fur.

Step 3: Draw fur on the top of the wolf's head between the ears. Start drawing circles of fur around the wolf's eyes. Between those curves of fur start drawing lines going upwards in all directions. continue drawing the fur on the bottoms of the ears, and make them go down towards the nose. At the line under the wolf's eyes draw lines going towards the center of wolf's face. Draw a circle of fur around the wolf's eye. On the ears of the wolf draw dark but small lines. Darken the fur that is between the ears. Draw a line of dark fur in the center of the wolf's ear. Now you are going to darken the wolf's eyes and nostrils. You are now going to shade in the nose, and add more fur between the eyes of the wolf. Add some fur around the mouth and connect it up with the fur next to the eyes. Now draw fur coming from the eyes and the center of the wolf's face, make it meet up with the edges of the wolf's face. Darken some of the lines on the wolf, and darken the top of his head. In the area around his cheeks don't shade anything; leave it white. Darken most of the end lines on the wolf. then finally make a body by drawing fur going towards the right, and connecting it to the face. That was how I draw a wolf. I hope you enjoyed it.

Sunday, November 8, 2015
Fifth Drawing Blog: How to Draw a Lion Part 2
Hi everybody, this is part 2 of my lion blog. I hope you enjoy.
Step 1: Start right above the lion's face, and make a few dark lines going upwards. The further they go up the lighter they get. Make the lines reach the oval of fur that we made for the lion. Make sure that the lines seem like they are coming right out of the top of the lion's head. After you make the lines on the top of the lion's head start curving the ends of them. In the areas where the ears are, don't put that much hair. Just throw in a few strands here and there. Now you are going to shade the bottom left side of his face. Shade that part darker then the rest of the body. Then draw some lines coming out of the shaded part. Draw lines coming from the oval of fur, and connect it to the shaded part on the left side of the lion's face. Draw the lines from the top left side of the face, and connect it to the lines of the shaded part. Once you are done drawing the fur to the shaded area, take out your eraser, and start erasing some curves on the lions face. This will make it seem like the lions hair is not perfect, and looks messy. Draw small little lines on the lions ear so he would have fur on his ear. Then shade in the lion's ear lightly. Make sure that the shade looks like fur, so make it have some lines.

Step 2: On the lion's face repeat what you did to the right side. Make sure that the lines aren't the same, make all the lines messy and different. This is so the hair will actually look like lion's hair. Make the bottom part of the lion's face darker, so it would seem like the hair is coming out of it. To draw the lion's body, just draw one line going to the left, and one going downwards. Shade this in, so it would seem like it has hair on its body. Now you are going to start shading in some of the hair. On some lines, darken the middle. Darken the top few strands.

Step 3: Darken the ends of all the bottom hair strands to make it look like it is against the body. Draw a few more strands coming out of all the fur, so the lion's hair would seem imperfect. Finally, this is optional, grab a small paint brush and some white paint and paint a few strands for whiskers.

Step 1: Start right above the lion's face, and make a few dark lines going upwards. The further they go up the lighter they get. Make the lines reach the oval of fur that we made for the lion. Make sure that the lines seem like they are coming right out of the top of the lion's head. After you make the lines on the top of the lion's head start curving the ends of them. In the areas where the ears are, don't put that much hair. Just throw in a few strands here and there. Now you are going to shade the bottom left side of his face. Shade that part darker then the rest of the body. Then draw some lines coming out of the shaded part. Draw lines coming from the oval of fur, and connect it to the shaded part on the left side of the lion's face. Draw the lines from the top left side of the face, and connect it to the lines of the shaded part. Once you are done drawing the fur to the shaded area, take out your eraser, and start erasing some curves on the lions face. This will make it seem like the lions hair is not perfect, and looks messy. Draw small little lines on the lions ear so he would have fur on his ear. Then shade in the lion's ear lightly. Make sure that the shade looks like fur, so make it have some lines.

Step 2: On the lion's face repeat what you did to the right side. Make sure that the lines aren't the same, make all the lines messy and different. This is so the hair will actually look like lion's hair. Make the bottom part of the lion's face darker, so it would seem like the hair is coming out of it. To draw the lion's body, just draw one line going to the left, and one going downwards. Shade this in, so it would seem like it has hair on its body. Now you are going to start shading in some of the hair. On some lines, darken the middle. Darken the top few strands.

Step 3: Darken the ends of all the bottom hair strands to make it look like it is against the body. Draw a few more strands coming out of all the fur, so the lion's hair would seem imperfect. Finally, this is optional, grab a small paint brush and some white paint and paint a few strands for whiskers.

Subscribe to:
Posts (Atom)