Hey guys! Its Minas and today I just want to talk about things I like, and how I got into drawings.
How I got into drawings: I got into drawing in the age of 8, and now I am currently 13. Which means I have been drawing for 5 years. I got into drawing when I went to my cousins house one day, and saw my cousin drawing. Now my cousin is going towards a career of being an artist and that really inspired me to draw. I thought I would be able to draw like him when I started, but I didn't and I drew terribly. At that time I didn't think I would get better, but then my cousin started giving tips, and I started to draw more often. Now back in present times I am drawing whenever I have free time to get better. that is how I got into drawing, and how I became to draw like how I do today.
Things that I like: Over the 13 years of my life I have grown an interest in many things I am here with you know to talk about them. As you all know my number one favorite thing to do is draw. It is a perfect way to show emotions, and use your free time. I love all kinds of art realistic, fiction, anime. These topics all have an interesting drawing perspective to them, that's why I like them. Going outside the art topic the other things I like, are video games and books. Even though i don't read books that often I love to sit down on some days and just read a good book. I also don't play video games that often usually I'll just play a game with my friends for a little then get off. Even after all of those things there is one thing that makes me even happier then drawing, my family. My family make my life happy, always encouraging me to do thing I didn't think I can. They always give me there support and love, and that's why they make me happy. They are the best, and I love them very much.
I hope you enjoyed my little blog about my life, and drawings will be back next week.
Sunday, December 6, 2015

Sunday, November 15, 2015
Sixth Drawing Blog: How to Draw a Wolf
Step 1: Start with two six centimeter boxes, one on top of the other. Draw two small circles in the top corners of the bottom box. Draw a small triangle coming from the outside of the eye. This is the black line that helps the wolf not get dust into its eyes. Let there be a small curve at the end of this triangle, and then do this all to the other eye. Now draw a small oval in the center of the wolf's eye this will be the pupil. Shade the pupil in lightly, but don't shade the top of the oval. Draw a small semi-oval at the bottom middle of the square. Now finish the semi-oval by drawing the bottom part more circular then an oval. Draw a line from the bottom of the oval, and make it reach the bottom line of the square. To draw the nostrils of the nose have a circle right next to the line, and have a small line going to the side of the wolf's nose.
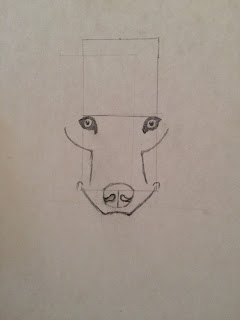
Step 2: Draw a small curved line under the eye, and make it go to the side of the nose. Do this also to the other side. Under the nose draw a small frowning mouth about the size of the nose. Then on each side, curve a line upwards so the line meets up with the line that we put under the eyes. Draw a small curve at the end of the lines, then make a smiling mouth right under it. This will make the wolf's mouth. Now, draw a six centimeter line going outwards on each side of the top box. Then draw a line downwards from those lines to make another box. Draw a big curve around the top of the wolf's head. The curves should be close to touching the sides of the new box we just made. On each side of the head draw a protruding triangular piece. This will be the wolf's ears. On the bottom sides of the ears draw multiple lines going outwards. This will be the fur.

Step 3: Draw fur on the top of the wolf's head between the ears. Start drawing circles of fur around the wolf's eyes. Between those curves of fur start drawing lines going upwards in all directions. continue drawing the fur on the bottoms of the ears, and make them go down towards the nose. At the line under the wolf's eyes draw lines going towards the center of wolf's face. Draw a circle of fur around the wolf's eye. On the ears of the wolf draw dark but small lines. Darken the fur that is between the ears. Draw a line of dark fur in the center of the wolf's ear. Now you are going to darken the wolf's eyes and nostrils. You are now going to shade in the nose, and add more fur between the eyes of the wolf. Add some fur around the mouth and connect it up with the fur next to the eyes. Now draw fur coming from the eyes and the center of the wolf's face, make it meet up with the edges of the wolf's face. Darken some of the lines on the wolf, and darken the top of his head. In the area around his cheeks don't shade anything; leave it white. Darken most of the end lines on the wolf. then finally make a body by drawing fur going towards the right, and connecting it to the face. That was how I draw a wolf. I hope you enjoyed it.


Step 2: Draw a small curved line under the eye, and make it go to the side of the nose. Do this also to the other side. Under the nose draw a small frowning mouth about the size of the nose. Then on each side, curve a line upwards so the line meets up with the line that we put under the eyes. Draw a small curve at the end of the lines, then make a smiling mouth right under it. This will make the wolf's mouth. Now, draw a six centimeter line going outwards on each side of the top box. Then draw a line downwards from those lines to make another box. Draw a big curve around the top of the wolf's head. The curves should be close to touching the sides of the new box we just made. On each side of the head draw a protruding triangular piece. This will be the wolf's ears. On the bottom sides of the ears draw multiple lines going outwards. This will be the fur.

Step 3: Draw fur on the top of the wolf's head between the ears. Start drawing circles of fur around the wolf's eyes. Between those curves of fur start drawing lines going upwards in all directions. continue drawing the fur on the bottoms of the ears, and make them go down towards the nose. At the line under the wolf's eyes draw lines going towards the center of wolf's face. Draw a circle of fur around the wolf's eye. On the ears of the wolf draw dark but small lines. Darken the fur that is between the ears. Draw a line of dark fur in the center of the wolf's ear. Now you are going to darken the wolf's eyes and nostrils. You are now going to shade in the nose, and add more fur between the eyes of the wolf. Add some fur around the mouth and connect it up with the fur next to the eyes. Now draw fur coming from the eyes and the center of the wolf's face, make it meet up with the edges of the wolf's face. Darken some of the lines on the wolf, and darken the top of his head. In the area around his cheeks don't shade anything; leave it white. Darken most of the end lines on the wolf. then finally make a body by drawing fur going towards the right, and connecting it to the face. That was how I draw a wolf. I hope you enjoyed it.

Sunday, November 8, 2015
Fifth Drawing Blog: How to Draw a Lion Part 2
Hi everybody, this is part 2 of my lion blog. I hope you enjoy.
Step 1: Start right above the lion's face, and make a few dark lines going upwards. The further they go up the lighter they get. Make the lines reach the oval of fur that we made for the lion. Make sure that the lines seem like they are coming right out of the top of the lion's head. After you make the lines on the top of the lion's head start curving the ends of them. In the areas where the ears are, don't put that much hair. Just throw in a few strands here and there. Now you are going to shade the bottom left side of his face. Shade that part darker then the rest of the body. Then draw some lines coming out of the shaded part. Draw lines coming from the oval of fur, and connect it to the shaded part on the left side of the lion's face. Draw the lines from the top left side of the face, and connect it to the lines of the shaded part. Once you are done drawing the fur to the shaded area, take out your eraser, and start erasing some curves on the lions face. This will make it seem like the lions hair is not perfect, and looks messy. Draw small little lines on the lions ear so he would have fur on his ear. Then shade in the lion's ear lightly. Make sure that the shade looks like fur, so make it have some lines.

Step 2: On the lion's face repeat what you did to the right side. Make sure that the lines aren't the same, make all the lines messy and different. This is so the hair will actually look like lion's hair. Make the bottom part of the lion's face darker, so it would seem like the hair is coming out of it. To draw the lion's body, just draw one line going to the left, and one going downwards. Shade this in, so it would seem like it has hair on its body. Now you are going to start shading in some of the hair. On some lines, darken the middle. Darken the top few strands.

Step 3: Darken the ends of all the bottom hair strands to make it look like it is against the body. Draw a few more strands coming out of all the fur, so the lion's hair would seem imperfect. Finally, this is optional, grab a small paint brush and some white paint and paint a few strands for whiskers.

Step 1: Start right above the lion's face, and make a few dark lines going upwards. The further they go up the lighter they get. Make the lines reach the oval of fur that we made for the lion. Make sure that the lines seem like they are coming right out of the top of the lion's head. After you make the lines on the top of the lion's head start curving the ends of them. In the areas where the ears are, don't put that much hair. Just throw in a few strands here and there. Now you are going to shade the bottom left side of his face. Shade that part darker then the rest of the body. Then draw some lines coming out of the shaded part. Draw lines coming from the oval of fur, and connect it to the shaded part on the left side of the lion's face. Draw the lines from the top left side of the face, and connect it to the lines of the shaded part. Once you are done drawing the fur to the shaded area, take out your eraser, and start erasing some curves on the lions face. This will make it seem like the lions hair is not perfect, and looks messy. Draw small little lines on the lions ear so he would have fur on his ear. Then shade in the lion's ear lightly. Make sure that the shade looks like fur, so make it have some lines.

Step 2: On the lion's face repeat what you did to the right side. Make sure that the lines aren't the same, make all the lines messy and different. This is so the hair will actually look like lion's hair. Make the bottom part of the lion's face darker, so it would seem like the hair is coming out of it. To draw the lion's body, just draw one line going to the left, and one going downwards. Shade this in, so it would seem like it has hair on its body. Now you are going to start shading in some of the hair. On some lines, darken the middle. Darken the top few strands.

Step 3: Darken the ends of all the bottom hair strands to make it look like it is against the body. Draw a few more strands coming out of all the fur, so the lion's hair would seem imperfect. Finally, this is optional, grab a small paint brush and some white paint and paint a few strands for whiskers.

Sunday, November 1, 2015
Fourth Drawing Blog: How to Draw a Lion Part 1
Hi everybody! This week I'll be working on part 1 of a lion drawing. I hope you enjoy it.
Step 1: Draw a two and a half inch square, and cut it in half twice so there are four smaller squares. Then around that you are going to draw a five inch box. Make sure that the bottom of the five inch box is part of the bottom of the smaller box. Draw a small line in between the boxes. Now you are going to draw a small heart that has no tip. Make sure the two lines of the heart end at the crossing of the smaller boxes. Then you are going to draw two circles both on opposite sides of the two squares. After that you are going to draw a circle around that circle and draw two small squares protruding from it: one from the bottom, and one from the left and right. You are then going to draw a flat "v" from the two bottom boxes. In the middle of that "v" you are going to draw a thick "t". You are then going to draw two big curves from one side of the lions face to the other. Right under it you are going to draw a small oval. Make sure that the bottom of the oval seems fury, so draw protruding lines out of it.

Step 2: Draw a lot of small dots on the lion's face right above the two curves. Now you are going to draw two upside down "c"s with fur in front of it. Now draw a big oval of fur around all of this to make the lion's face. Darken the area around the eyes. Then draw a dot for the pupil and shade the eye in lightly. Then around the eye, draw some fur, brushing multiple line outwards away from the eye. Do this to the other eye. Darken the nose now and put some light dots on it. Shade very lightly around the nose to the mouth.

Step 3: Now you are going to shade in the mouth, so it would be very dark. Draw a few lines coming from the mouth going to the fury oval, so it would seem connected. Shade in the lion's face so that the sides of his face is darker then the middle. Lightly shade in the middle and darken the areas around his eyes. Make a dark line from the top of the heart that we drew in the beginning, that ends at the bottom of the eyes.

Step 1: Draw a two and a half inch square, and cut it in half twice so there are four smaller squares. Then around that you are going to draw a five inch box. Make sure that the bottom of the five inch box is part of the bottom of the smaller box. Draw a small line in between the boxes. Now you are going to draw a small heart that has no tip. Make sure the two lines of the heart end at the crossing of the smaller boxes. Then you are going to draw two circles both on opposite sides of the two squares. After that you are going to draw a circle around that circle and draw two small squares protruding from it: one from the bottom, and one from the left and right. You are then going to draw a flat "v" from the two bottom boxes. In the middle of that "v" you are going to draw a thick "t". You are then going to draw two big curves from one side of the lions face to the other. Right under it you are going to draw a small oval. Make sure that the bottom of the oval seems fury, so draw protruding lines out of it.

Step 2: Draw a lot of small dots on the lion's face right above the two curves. Now you are going to draw two upside down "c"s with fur in front of it. Now draw a big oval of fur around all of this to make the lion's face. Darken the area around the eyes. Then draw a dot for the pupil and shade the eye in lightly. Then around the eye, draw some fur, brushing multiple line outwards away from the eye. Do this to the other eye. Darken the nose now and put some light dots on it. Shade very lightly around the nose to the mouth.

Step 3: Now you are going to shade in the mouth, so it would be very dark. Draw a few lines coming from the mouth going to the fury oval, so it would seem connected. Shade in the lion's face so that the sides of his face is darker then the middle. Lightly shade in the middle and darken the areas around his eyes. Make a dark line from the top of the heart that we drew in the beginning, that ends at the bottom of the eyes.

Sunday, October 25, 2015
Third Origami Blog: Origami Boomerang
Step 1: Get a normal sheet of printer paper, and cut it in half lengthwise. Now get one of the sheets of paper, and fold it in half lengthwise. Now you are going to unfold that, and bring both sides of the paper to the newly created line. Now fold the paper in half. Make sure that the part you just folded is in the inside. Then you are going to fold the corners on the folded side to the line, and unfold it. Finally you are going to do a forward fold folding the corners inside the paper.


Step 2: Unfold the paper so it looks like a large rectangle again. Now you are going to take one of the folded sides, and unfold it. (It matters which hand you use, in my case I'm unfolding the right side, because I am right handed.) Fold the paper in half away from you. Then flip the paper over, and fold each side of the diamond, so they will fold easily. Flip the paper back over and, get the diamond part and squish it to the side, so it looks like it collapsed. Finally get the bottom portion of the unfolded piece, and fold it back to the center.


Step 3: Fold the bottom portion of the other side of the boomerang, so it overlaps the side we just folded. Then fold the corner on the top portion, so it over laps the top of the portion on the other side. Now unfold both of the bottom portions of the boomerang. Then you are going to fold the left side down and then right side, making sure the right side goes into the pocket on the top of the left side.

Step 4: On each end of the boomerang open the ends and fold the tips to the middle. Then do a forward fold on only one of the corners on each side. Then grab the other folded corner, and fold it into the pocket that the forward fold made for the other corners. This should give the boomerang a "point". Now you are done with your origami boomerang. To throw your boomerang grab it in the middle making sure that the diagonal part is facing upwards, and that your index finger is at the point of the diagonal while you thumb is right under it. Happy throwing.


Step 2: Unfold the paper so it looks like a large rectangle again. Now you are going to take one of the folded sides, and unfold it. (It matters which hand you use, in my case I'm unfolding the right side, because I am right handed.) Fold the paper in half away from you. Then flip the paper over, and fold each side of the diamond, so they will fold easily. Flip the paper back over and, get the diamond part and squish it to the side, so it looks like it collapsed. Finally get the bottom portion of the unfolded piece, and fold it back to the center.


Step 3: Fold the bottom portion of the other side of the boomerang, so it overlaps the side we just folded. Then fold the corner on the top portion, so it over laps the top of the portion on the other side. Now unfold both of the bottom portions of the boomerang. Then you are going to fold the left side down and then right side, making sure the right side goes into the pocket on the top of the left side.

Step 4: On each end of the boomerang open the ends and fold the tips to the middle. Then do a forward fold on only one of the corners on each side. Then grab the other folded corner, and fold it into the pocket that the forward fold made for the other corners. This should give the boomerang a "point". Now you are done with your origami boomerang. To throw your boomerang grab it in the middle making sure that the diagonal part is facing upwards, and that your index finger is at the point of the diagonal while you thumb is right under it. Happy throwing.

Sunday, October 18, 2015
Second Origami Blog: 8-Pointed Transforming Ninja Star
Step 1: Get eight of the same size pieces of paper; they must be square. Mine is going to be around the same size as a post-it note. Grab the paper and place it so it looks like a diamond. Fold it in half so that it looks like a triangle. Then unfold it and fold it again the other way so that there will be an "x" mark on it. The fold the square in half. Your paper should look like it has an "x" with a line over the center.

Step 2: Now you are going to fold two of the corners to the center of the x. Then you are going to fold the entire thing in half like a paper airplane. There should be a small diagonal line running through one of the sides. Grab the side of that diagonal, and fold it in itself. Your paper should now look like a parallelogram. Do this to the seven other pieces of paper.


Step 3: Once you have finished all of the papers, it is time to put them all together. Grab two of the papers you made, and put them next to each other. Grab the side that is folded in half, and put it into the part where we folded in. Make sure that the piece is a little bit higher than the line of the side we folded in. Two corners should be protruding out now. Fold them into the other piece of paper. Continue doing this to all the other pieces going slowly in a circle.


Step 4 (transforming): Now you are done with your transforming ninja star. To transform the ninja star just push on the sides and to form it back pull on the sides.


Step 2: Now you are going to fold two of the corners to the center of the x. Then you are going to fold the entire thing in half like a paper airplane. There should be a small diagonal line running through one of the sides. Grab the side of that diagonal, and fold it in itself. Your paper should now look like a parallelogram. Do this to the seven other pieces of paper.


Step 3: Once you have finished all of the papers, it is time to put them all together. Grab two of the papers you made, and put them next to each other. Grab the side that is folded in half, and put it into the part where we folded in. Make sure that the piece is a little bit higher than the line of the side we folded in. Two corners should be protruding out now. Fold them into the other piece of paper. Continue doing this to all the other pieces going slowly in a circle.


Step 4 (transforming): Now you are done with your transforming ninja star. To transform the ninja star just push on the sides and to form it back pull on the sides.


Sunday, October 11, 2015
First Origami blog: Swan
This will be my first blog on origami, and I will be making a swan. Don't worry about my art blogs, they'll be coming back next week. I just need some more time to draw a certain character. I hope you enjoy my first origami blog.
Preparations: Get a rectangular piece of paper facing away from you, then fold it in half so there is a couple inches of space not getting covered. Cut off that area where it is not being covered. This will make the paper square.
Step 1: Get the square piece of paper and turn it, so it looks like a diamond. Then you will fold the corner like, an upside down airplane. Make sure the sides are meeting at the center of the line. You should be left with a long triangle and a small one on top off it. Fold the small triangle away from you, so it would be on the other side. The tip of that triangle should be aligned with the line that we made in the beginning.


Step 2: Fold the tip of the small triangle, so it meets with the line on the top. Unfold that part and bring the small triangle line that we just made to the big line at the bigger triangle. Now fold the entire thing in half from the line we made in the beginning. Grab the smaller triangle which, should look more like a right triangle now, and move it a couple centimeters down. Once you got the preferred distance press down on i, so it would stay like that. It should resemble something like my picture right now.


Step 3: Grab both flaps of the bigger triangle and fold them upwards, so they meet with the big line. Fold the big triangle in half, so its tip meets with the tip of the smaller triangle. Then unfold it. Next draw a line from the area you just unfolded, there should be a crease there. From the top of that line draw a diagonal line to the bottom of the small triangle. Fold the big triangle in the way of that diagonal. Now unfold that, a small corner should have been made. Press on it lightly, making sure that the part with the drawn lines is facing you. This is called a reverse fold.


Step 4: Fold the piece of the reverse fold towards the wings. You will have to do a reverse fold for this, so use the corner on the bottom for it. You are then going to open one side of that triangle, and get the tip of it, then fold it down. Then bring some of the tip back up, and fold it back in half. Now it should look like the triangle has a small protruding piece coming out of the top of it.


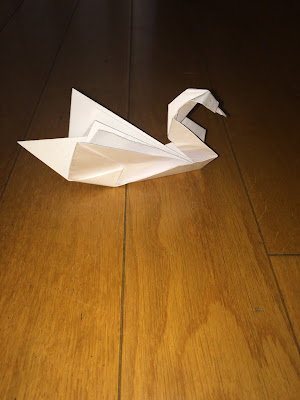
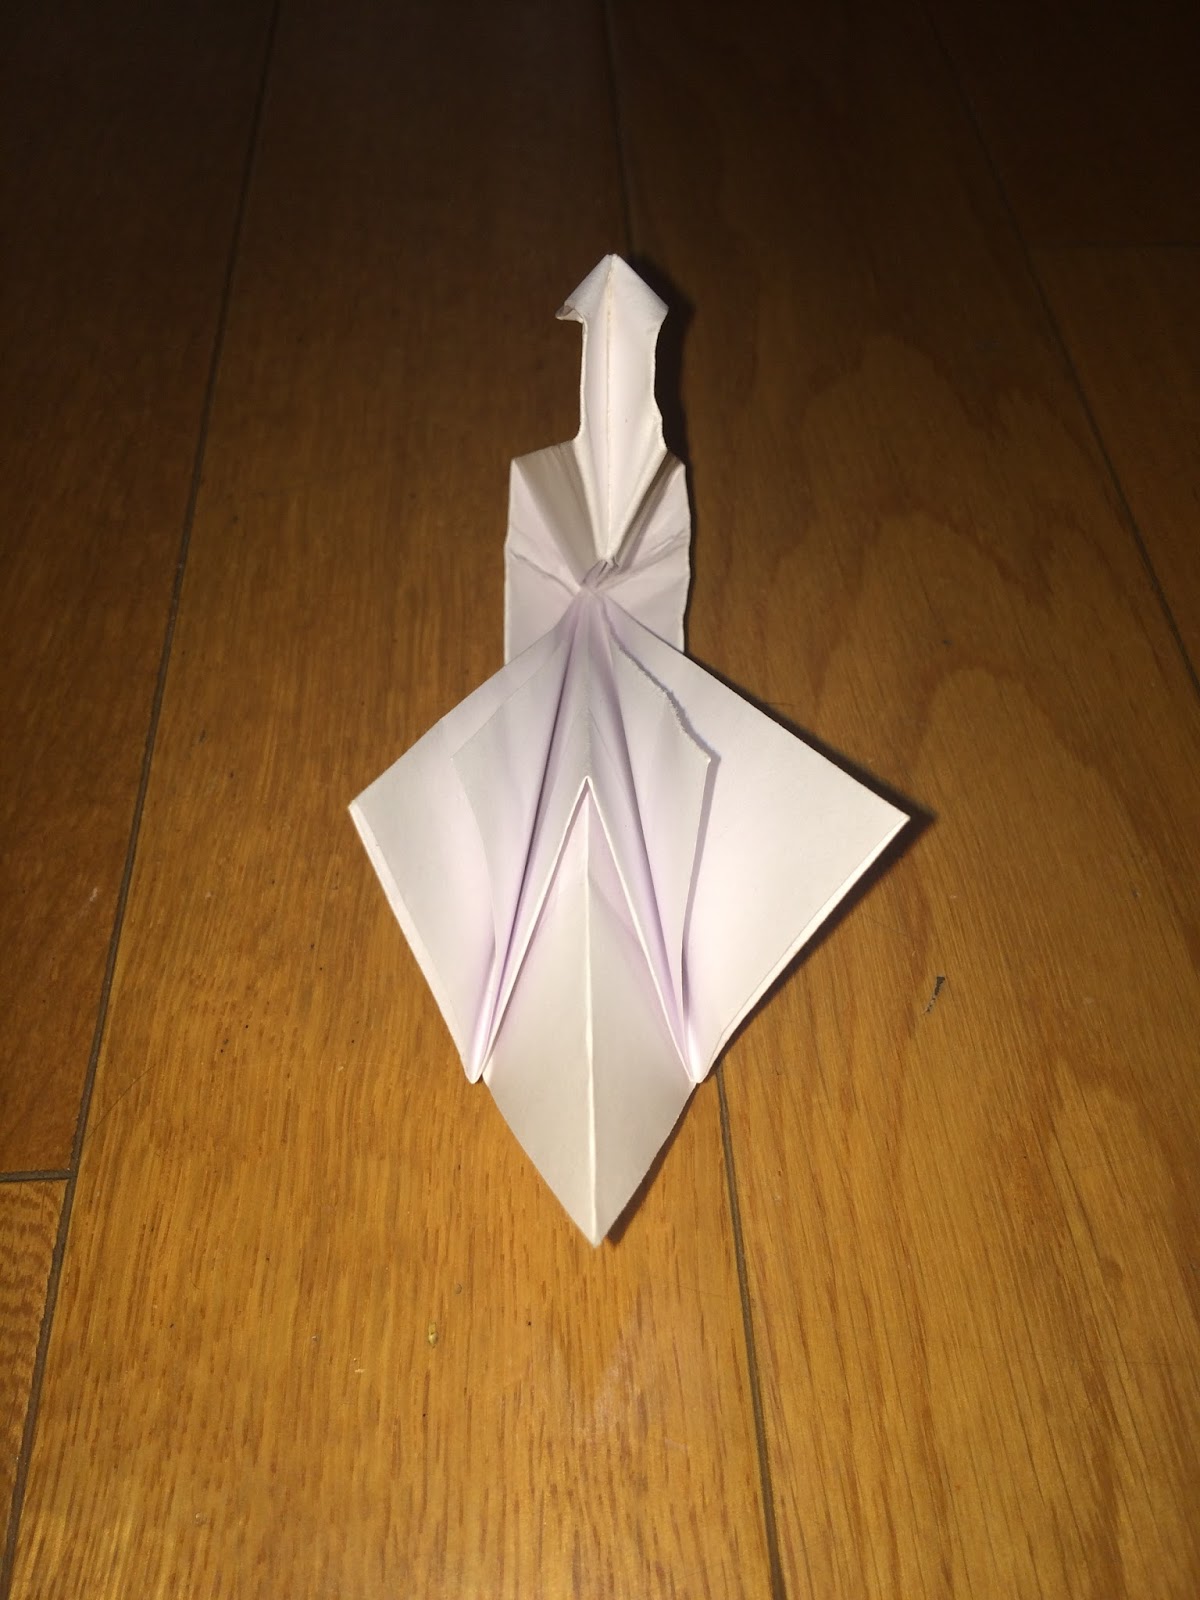
Step 5: Fold half of the thin triangle in an upwards angle. Then unfold it, and do a reverse fold on it. Fold the tip of that triangle side ways then unfold, and do a forward center fold (a reverse fold going forwards). Finally, fold all of the triangle flaps on its body downwards giving it some wings. You are now done with your swan.

Preparations: Get a rectangular piece of paper facing away from you, then fold it in half so there is a couple inches of space not getting covered. Cut off that area where it is not being covered. This will make the paper square.
Step 1: Get the square piece of paper and turn it, so it looks like a diamond. Then you will fold the corner like, an upside down airplane. Make sure the sides are meeting at the center of the line. You should be left with a long triangle and a small one on top off it. Fold the small triangle away from you, so it would be on the other side. The tip of that triangle should be aligned with the line that we made in the beginning.


Step 2: Fold the tip of the small triangle, so it meets with the line on the top. Unfold that part and bring the small triangle line that we just made to the big line at the bigger triangle. Now fold the entire thing in half from the line we made in the beginning. Grab the smaller triangle which, should look more like a right triangle now, and move it a couple centimeters down. Once you got the preferred distance press down on i, so it would stay like that. It should resemble something like my picture right now.


Step 3: Grab both flaps of the bigger triangle and fold them upwards, so they meet with the big line. Fold the big triangle in half, so its tip meets with the tip of the smaller triangle. Then unfold it. Next draw a line from the area you just unfolded, there should be a crease there. From the top of that line draw a diagonal line to the bottom of the small triangle. Fold the big triangle in the way of that diagonal. Now unfold that, a small corner should have been made. Press on it lightly, making sure that the part with the drawn lines is facing you. This is called a reverse fold.


Step 4: Fold the piece of the reverse fold towards the wings. You will have to do a reverse fold for this, so use the corner on the bottom for it. You are then going to open one side of that triangle, and get the tip of it, then fold it down. Then bring some of the tip back up, and fold it back in half. Now it should look like the triangle has a small protruding piece coming out of the top of it.


Step 5: Fold half of the thin triangle in an upwards angle. Then unfold it, and do a reverse fold on it. Fold the tip of that triangle side ways then unfold, and do a forward center fold (a reverse fold going forwards). Finally, fold all of the triangle flaps on its body downwards giving it some wings. You are now done with your swan.

Subscribe to:
Posts (Atom)