Tuesday, May 3, 2016
A Game I Like
Hi guys I just wanted to talk to you about a very good game I've been playing recently. This games name is Dark Souls 3. This game is by far the best game in the trilogy. This is also probably one of my favorite games ever. Dark Souls III is an action role-playing video game. It was created by the company FromSoftwhere and Bandai Namco. In this game there are ten diffrent classes. Theses classes are the Knight, Mercenary, Warrior, Herald, Theif, Assassin, Sorcerer, Pyromancer, Cleric, and Deprived. To Make it simple I will be talking about the class I mainly play which is Sorcerer. In the beginning of the game the Sorcerer starts off with a Mail Breaker, Sorcerers Staff, Leather Shield, Young Dragon Ring, Soul arrow/ Heavy soul arrow, and normal Sorcerer armor. The game play of this game is amazing and I highly recommend playing it. There are still so many things not yet discovered about this game. Well... that was me talking about Dark Souls 3 I hope you enjoyed it, and I hope you guys one day play it.

Tuesday, April 26, 2016
A Game I like
Hi guys I've been wanting to talk to you guys about really cool game that I recently found out about and have been playing. That game is called Monaco Whats yours is mine. Monaco is a stealth action video game, and was made by the company Pocket watch Games. The game is pixelated and the camera in which you see from is a overhead view. In this game you are suppose to accomplish a goal like hack into a company or steal a special item from people. You can choose from eight different classes, which are the Locksmith, Pickpocketer, Cleaner, Lookout, Mole, Gentleman, Hacker, and the Redhead. My favorite class is the Gentleman, because when he is hidden he is able to disguise himself as an enemy guard. This game is also a multiplayer game with multiplayer missions. If you are playing multiplayer mode the players choose from different classes, and all work together to accomplish the same goal but each class also gets a side mission. I hope you guys enjoyed this small post about Monaco, and I hope you guys will be able to play it.
Saturday, April 23, 2016
Eighth Drawing Blog: How to Draw a Dog part 2
Step 1: Draw the dogs teeth making it smaller the closer you get to the two original teeth. Make sure the tooth furthest away from the two teeth at the very end of the dogs mouth is rounded. Add small rounded circles between the dogs two big teeth at the end of his mouth. Start drawing darker lines on the inside of his mouth going towards his snout.


Tuesday, April 19, 2016
More Games I like
Hi guys I wanted to talk to you guys about a game that I really like. This game is called Rocket League. Rocket League is a soccer game, but you play as cars. This game caught my eye the second it came out, and at that moment I had to buy it. I got this game on steam, but you can get it on the Ps4 and Xbox1. There are multiple kinds of game mode in Rocket League, but I am just going to talk about the normal soccer mode. The game is usually a three versus three game, but there is also a one versus one mode. In this game you get ranked by level, in order these ranks are Rookie, Semi-pro, Pro, Veteran, Expert, Master, Legend, and Rocketeer. This game is really good. You can do all sort of crazy stuff like launching yourself in the air to block the ball from being scored. Anyways in the game you have to score the ball into the enemy's goal to win, and you also have to try to defend them from scoring on your goal. There are a lot of things you can do in this game, and I will let you find them out. I hope you guys end up playing this game it is very fun.
Tuesday, April 12, 2016
Another Game I like
Hi guys I just wanted to talk about another game that a recently got into. This game is called Counter Strike Global Offensive. I'm sure most of you already know what this game is speaking that it has over 10 million copies sold world-wide, but I'll still be explaining what its like. I will be referring to this game as CSGO during this blog as many people call it. CSGO is a team based action game, and is also a first person shooter. In CSGO there are multiple types of weapons rifles, smgs, heavy, and pistols. There are also a wide assortment of grenades. In Counter Strike there is 5 modes (casual, demolition, death-match, arms race, competitive). To make everything easier I will only be talking about competitive mode. The main thing in competitive is to win of course. There are three ways to win; for both teams its to kill the entire enemy team. For terrorists it is to plant the bomb and let it explode, while counter terrorist's personal way to winning is defusing the bomb. There are usually 30 rounds in a competitive. My favorite maps are Mirage, Dust 2, and Cahce.
Tuesday, March 22, 2016
Games I Like
Hello everyone today I wanted to talk about a game I have been recently playing to you guys.
 I recently got into is Guild Wars 2, and I am happy I did. This game was developed by Arenanet, and I think its awesome. Guild Wars 2 is a massive game, I have been playing this game for 2 weeks now and I only have 7% of the game done. In this game you can choose from five different races Char, Human, Asura, Sylvari, and Norn. After you have chosen from these various races you have to choose your class. The classes you can choose from are Mesmer, Guardian, Necromancer, Ranger, Elementalist, and Warrior. To break things down so it will be easier for everyone to under stand I will be talking about my own class and race. I am a Human Necromancer, and I think the necromancer class is amazing. You can summon your own minions to help you fight, and you can suck the life force out of enemy's and transfer it to you. There are just so many things you can do in guild wars you can do events, you can do your quests or you can do your personal story quest. The best part is every so often an event boss spawns in the server. Usually when an event boss spawns its a group event that means a lot of other player in that server are going to join and help fight to kill the boss. When the boss dies everyone gets loot. This is why I think Guild Wars 2 is an awesome game
I recently got into is Guild Wars 2, and I am happy I did. This game was developed by Arenanet, and I think its awesome. Guild Wars 2 is a massive game, I have been playing this game for 2 weeks now and I only have 7% of the game done. In this game you can choose from five different races Char, Human, Asura, Sylvari, and Norn. After you have chosen from these various races you have to choose your class. The classes you can choose from are Mesmer, Guardian, Necromancer, Ranger, Elementalist, and Warrior. To break things down so it will be easier for everyone to under stand I will be talking about my own class and race. I am a Human Necromancer, and I think the necromancer class is amazing. You can summon your own minions to help you fight, and you can suck the life force out of enemy's and transfer it to you. There are just so many things you can do in guild wars you can do events, you can do your quests or you can do your personal story quest. The best part is every so often an event boss spawns in the server. Usually when an event boss spawns its a group event that means a lot of other player in that server are going to join and help fight to kill the boss. When the boss dies everyone gets loot. This is why I think Guild Wars 2 is an awesome game
Sunday, March 20, 2016
Ninth drawing blog: How to Draw a Kitten Part: 1
Step 1: Draw a rough circle. At the bottom of this circle make a small upside down semi-circle. On each side of the circle draw triangles. Make sure these triangles are at the top of the head because these are going to be the kitten's ears. For the kitten's nose/mouth draw and upside down triangle, and make a small upside down "Y" touching its tip. For the kittens eyes draw two ovals, and add small circles that have the top left side cut off. Above the kitten's eyes draw an "M" in chicken scratch form. On the sides of the eyes draw a small curve going downwards. Under the left eye draw a small curved "V" and for the right eye draw a big curved "V". Make the kitten's neck by drawing a big obtuse angle going downwards. Back to the kittens eyes. Go to the areas that were cut off, and draw a bubbly circle for each eye. Shade in the pupil dark black and outline the outside of the eye with the same dark black. Shade in the cornea (area around the kittens pupil) by making it darker the further it is away from the pupil.


Friday, March 18, 2016
Just Talking
Hi guys Minas here I just wanted to sit down and right to guys about something that I like a lot. If you guys don't know I love drawing, and I love origami hence forth why i made this blog about those subjects. In a recent blog post I told you guys how I got into drawing, now I am going to tell you guys how I got into origami.
I got into origami in a way that most people might not have thought. A few years back before I started blogging my family and I went to an art museum. When I was at the that museum I saw many sculptures that really fascinated me. After that trip I decided I wanted to start sculpting, but I didn't know how and the supplies for it were to expensive for me to buy. After that I thought of other ways to sculpt and origami came to me. Origami was simple and the materials for it were cheap (just paper). I started by making simple airplanes slowly getting better and making more advanced creations. I now usually build an origami creation weekly to daily because it fascinates me. That's how I got into origami I hope you enjoyed this blog see you next time.
I got into origami in a way that most people might not have thought. A few years back before I started blogging my family and I went to an art museum. When I was at the that museum I saw many sculptures that really fascinated me. After that trip I decided I wanted to start sculpting, but I didn't know how and the supplies for it were to expensive for me to buy. After that I thought of other ways to sculpt and origami came to me. Origami was simple and the materials for it were cheap (just paper). I started by making simple airplanes slowly getting better and making more advanced creations. I now usually build an origami creation weekly to daily because it fascinates me. That's how I got into origami I hope you enjoyed this blog see you next time.
Sunday, February 28, 2016
Origami Blog: How to Make An Origami Crane
Step 1: First get a normal sheet of printer paper and make it into a square piece of paper. Fold the square piece of paper in half both ways. Your paper should have a plus going through the paper, and a a line going through the middle. Now turn the paper so it looks like a diamond, and Fold it in half to make a triangle. Do a reverse fold going inward on the triangle. This will take out on of the corners in the paper. Now do the same thing to the other corner.


Origami Blog: How to Make an Origami Dove
Step 1: Get a square piece of paper and turn it, so it looks like a diamond. Then grab the bottom flap and fold it upwards. It should look like a triangle now. Now fold the right side of the triangle to the left side, then unfold it. Bring the tip of the right side to the top of the triangle. Do same thing to the left side. Now fold each of the sides downwards, so there tips are now on the bottom. Then unfold the piece so it is back to a small diamond.


Step 3: Fold the flaps that made a ninety degree angle back to its original side leaving some of it on the side it was still on. On the very bottom of the paper (opposite to the corner that was reverse folded in step three) fold the tip of the corner to the side. Now unfold this, and do a reverse fold on the corner. You are now done with your origami dove.

Origami Blog: How to make a Jumping Frog
Step 1: Get a square piece of paper and fold it in half vertically. Then fold the piece of paper in half again, but this time horizontally. Grab the flap that is facing you, and fold that back up. Now unfold everything so it looks like a rectangle again. Fold the left corner down towards the other side unfold that and do the same thing to the other corner. Do a revere fold on those corners making that top section turn into a triangle.

Step 2: Fold the bottom flap of the rectangle so it meets up with the bottom of the triangle. Grab one side of the triangle, and bring it to the other side. With the corner gone fold the rectangle part of the paper to the middle. When you are done with that fold the triangle back to its place, do that to the other side. Fold the rectangle part of the triangle again so it meets up with the bottom of the triangle. Fold the corners of that rectangle downwards so the corners meet up with the bottom. Now unfold the rectangle and do a reverse fold on those small corners. It should look like there is an upside down pentagon on the bottom of the triangle. Fold the corners of the trapezoid downwards to it looks like its an upside down trapezoid

Step 3: Fold the corners of the top triangle upwards to make small arms. Fold the middle trapezoid flaps towards there corresponding sides. Fold the pentagon upwards then unfold half of it back downwards. You are now done with your Origami Frog.

Tips on How to Draw Better
Hi guys I just wanted to sit down, and wright to you guys and explain how to get better at drawing. I am going to be using eight tricks that worked for me.
Number 1: Practice. I cant say this enough you have to practice drawing everyday, to get better. Even if its just a few sketches a day if you want to get good at drawing you have to practice.
Number 2: Use photos references. It is very hard to draw pictures well just using your mind. Have photo references of the picture you are drawing it will help you a lot.
Number 3: Study on one thing you like. If you like to draw animals stick with drawing animals for a while, and when you are ready to start a knew topic stay on that for a while. Don't just keep drawing new pictures you have to get used to the topic of art you are doing.
Number 4: Think of what your drawing as an abstract arrangement of different shapes it will help you in the long run.
Number 5: Make sure you know how to contrast your drawing knowing what is bright or dark.
Number 6: Have good art supplies. Don't just go to any craft store or online store and get art supplies because those aren't the best. Get your equipment form a store that sells them for a living that how you know they are good.
Number 7: Know what perspective your drawing at. You'll have to know the difference between first person second and third.
Number 8: Do not compare you art to other peoples art if it makes you feel bad. This will make you stress out, and even sometimes make your art look even worse. If you compare your art to someone that is better then you, and you feel sad about it you have to stop doing that.
Number 1: Practice. I cant say this enough you have to practice drawing everyday, to get better. Even if its just a few sketches a day if you want to get good at drawing you have to practice.
Number 2: Use photos references. It is very hard to draw pictures well just using your mind. Have photo references of the picture you are drawing it will help you a lot.
Number 3: Study on one thing you like. If you like to draw animals stick with drawing animals for a while, and when you are ready to start a knew topic stay on that for a while. Don't just keep drawing new pictures you have to get used to the topic of art you are doing.
Number 4: Think of what your drawing as an abstract arrangement of different shapes it will help you in the long run.
Number 5: Make sure you know how to contrast your drawing knowing what is bright or dark.
Number 6: Have good art supplies. Don't just go to any craft store or online store and get art supplies because those aren't the best. Get your equipment form a store that sells them for a living that how you know they are good.
Number 7: Know what perspective your drawing at. You'll have to know the difference between first person second and third.
Number 8: Do not compare you art to other peoples art if it makes you feel bad. This will make you stress out, and even sometimes make your art look even worse. If you compare your art to someone that is better then you, and you feel sad about it you have to stop doing that.
Sunday, January 31, 2016
Origami Blog: How to make an Origami Flapping Bird
Step 1: First get a normal sheet of printer paper and make it into a square piece of paper. If you don't know how to make the printer paper square check back on one of my older origami blogs. Fold the square piece of paper in half both ways. Your paper should have a plus going through the paper, and a a line going through the middle. Now turn the paper so it looks like a diamond, and do a reverse fold going inward. This will take out on of the corners in the paper. Now do the same thing to the other corner.


Seventh Drawing Blog: How to Draw a Dog part 1
Step 1: Draw a circle. Now you are going to draw the dogs snout. Make sure the snout has a good curve, to make it resemble a dog's nose. Start it in the middle of the circle and make it end at the bottom of the circle. Draw rounded triangles right above the snout, making the eyes. Draw an ear on both sides of the dogs face. The ears should look like a rounded triangle flopped over. Finally under the snout draw the neck draw one line, making half of the neck. then to the left of the ears draw a line going towards the left finishing the neck.


Sunday, January 17, 2016
Starting up Blogs Again
Hello everybody I just wanted to quickly talk to you guys about what has been happening the last three weeks and why I haven't been putting up blogs. First I want to start up by saying Happy New Years and have the rest of your year great. Now I want to talk about why I haven't been putting blogs. During the last three weeks I have been in winter break, and over that time I couldn't find to much time to write or draw. I have been drawing a few sketches, and are ready to share them with you guys in future blogs. Also during winter break I went to Florida. At Florida I was always doing something, and there was no electronics at the hotel my family and I stayed at except a TV. This made it so I wasn't able to post anything. My Florida was amazing though we went all over Universal Studios and Disney World. That is what happened to me for the past three weeks and weekly blogs will be starting up next week.
Sunday, December 6, 2015
Just Talking
Hey guys! Its Minas and today I just want to talk about things I like, and how I got into drawings.
How I got into drawings: I got into drawing in the age of 8, and now I am currently 13. Which means I have been drawing for 5 years. I got into drawing when I went to my cousins house one day, and saw my cousin drawing. Now my cousin is going towards a career of being an artist and that really inspired me to draw. I thought I would be able to draw like him when I started, but I didn't and I drew terribly. At that time I didn't think I would get better, but then my cousin started giving tips, and I started to draw more often. Now back in present times I am drawing whenever I have free time to get better. that is how I got into drawing, and how I became to draw like how I do today.
Things that I like: Over the 13 years of my life I have grown an interest in many things I am here with you know to talk about them. As you all know my number one favorite thing to do is draw. It is a perfect way to show emotions, and use your free time. I love all kinds of art realistic, fiction, anime. These topics all have an interesting drawing perspective to them, that's why I like them. Going outside the art topic the other things I like, are video games and books. Even though i don't read books that often I love to sit down on some days and just read a good book. I also don't play video games that often usually I'll just play a game with my friends for a little then get off. Even after all of those things there is one thing that makes me even happier then drawing, my family. My family make my life happy, always encouraging me to do thing I didn't think I can. They always give me there support and love, and that's why they make me happy. They are the best, and I love them very much.
I hope you enjoyed my little blog about my life, and drawings will be back next week.
How I got into drawings: I got into drawing in the age of 8, and now I am currently 13. Which means I have been drawing for 5 years. I got into drawing when I went to my cousins house one day, and saw my cousin drawing. Now my cousin is going towards a career of being an artist and that really inspired me to draw. I thought I would be able to draw like him when I started, but I didn't and I drew terribly. At that time I didn't think I would get better, but then my cousin started giving tips, and I started to draw more often. Now back in present times I am drawing whenever I have free time to get better. that is how I got into drawing, and how I became to draw like how I do today.
Things that I like: Over the 13 years of my life I have grown an interest in many things I am here with you know to talk about them. As you all know my number one favorite thing to do is draw. It is a perfect way to show emotions, and use your free time. I love all kinds of art realistic, fiction, anime. These topics all have an interesting drawing perspective to them, that's why I like them. Going outside the art topic the other things I like, are video games and books. Even though i don't read books that often I love to sit down on some days and just read a good book. I also don't play video games that often usually I'll just play a game with my friends for a little then get off. Even after all of those things there is one thing that makes me even happier then drawing, my family. My family make my life happy, always encouraging me to do thing I didn't think I can. They always give me there support and love, and that's why they make me happy. They are the best, and I love them very much.
I hope you enjoyed my little blog about my life, and drawings will be back next week.
Sunday, November 15, 2015
Sixth Drawing Blog: How to Draw a Wolf
Step 1: Start with two six centimeter boxes, one on top of the other. Draw two small circles in the top corners of the bottom box. Draw a small triangle coming from the outside of the eye. This is the black line that helps the wolf not get dust into its eyes. Let there be a small curve at the end of this triangle, and then do this all to the other eye. Now draw a small oval in the center of the wolf's eye this will be the pupil. Shade the pupil in lightly, but don't shade the top of the oval. Draw a small semi-oval at the bottom middle of the square. Now finish the semi-oval by drawing the bottom part more circular then an oval. Draw a line from the bottom of the oval, and make it reach the bottom line of the square. To draw the nostrils of the nose have a circle right next to the line, and have a small line going to the side of the wolf's nose.
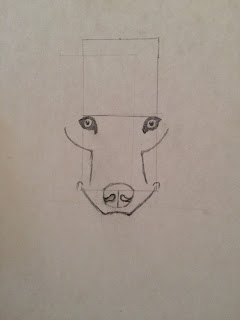
Step 2: Draw a small curved line under the eye, and make it go to the side of the nose. Do this also to the other side. Under the nose draw a small frowning mouth about the size of the nose. Then on each side, curve a line upwards so the line meets up with the line that we put under the eyes. Draw a small curve at the end of the lines, then make a smiling mouth right under it. This will make the wolf's mouth. Now, draw a six centimeter line going outwards on each side of the top box. Then draw a line downwards from those lines to make another box. Draw a big curve around the top of the wolf's head. The curves should be close to touching the sides of the new box we just made. On each side of the head draw a protruding triangular piece. This will be the wolf's ears. On the bottom sides of the ears draw multiple lines going outwards. This will be the fur.

Step 3: Draw fur on the top of the wolf's head between the ears. Start drawing circles of fur around the wolf's eyes. Between those curves of fur start drawing lines going upwards in all directions. continue drawing the fur on the bottoms of the ears, and make them go down towards the nose. At the line under the wolf's eyes draw lines going towards the center of wolf's face. Draw a circle of fur around the wolf's eye. On the ears of the wolf draw dark but small lines. Darken the fur that is between the ears. Draw a line of dark fur in the center of the wolf's ear. Now you are going to darken the wolf's eyes and nostrils. You are now going to shade in the nose, and add more fur between the eyes of the wolf. Add some fur around the mouth and connect it up with the fur next to the eyes. Now draw fur coming from the eyes and the center of the wolf's face, make it meet up with the edges of the wolf's face. Darken some of the lines on the wolf, and darken the top of his head. In the area around his cheeks don't shade anything; leave it white. Darken most of the end lines on the wolf. then finally make a body by drawing fur going towards the right, and connecting it to the face. That was how I draw a wolf. I hope you enjoyed it.


Step 2: Draw a small curved line under the eye, and make it go to the side of the nose. Do this also to the other side. Under the nose draw a small frowning mouth about the size of the nose. Then on each side, curve a line upwards so the line meets up with the line that we put under the eyes. Draw a small curve at the end of the lines, then make a smiling mouth right under it. This will make the wolf's mouth. Now, draw a six centimeter line going outwards on each side of the top box. Then draw a line downwards from those lines to make another box. Draw a big curve around the top of the wolf's head. The curves should be close to touching the sides of the new box we just made. On each side of the head draw a protruding triangular piece. This will be the wolf's ears. On the bottom sides of the ears draw multiple lines going outwards. This will be the fur.

Step 3: Draw fur on the top of the wolf's head between the ears. Start drawing circles of fur around the wolf's eyes. Between those curves of fur start drawing lines going upwards in all directions. continue drawing the fur on the bottoms of the ears, and make them go down towards the nose. At the line under the wolf's eyes draw lines going towards the center of wolf's face. Draw a circle of fur around the wolf's eye. On the ears of the wolf draw dark but small lines. Darken the fur that is between the ears. Draw a line of dark fur in the center of the wolf's ear. Now you are going to darken the wolf's eyes and nostrils. You are now going to shade in the nose, and add more fur between the eyes of the wolf. Add some fur around the mouth and connect it up with the fur next to the eyes. Now draw fur coming from the eyes and the center of the wolf's face, make it meet up with the edges of the wolf's face. Darken some of the lines on the wolf, and darken the top of his head. In the area around his cheeks don't shade anything; leave it white. Darken most of the end lines on the wolf. then finally make a body by drawing fur going towards the right, and connecting it to the face. That was how I draw a wolf. I hope you enjoyed it.

Sunday, November 8, 2015
Fifth Drawing Blog: How to Draw a Lion Part 2
Hi everybody, this is part 2 of my lion blog. I hope you enjoy.
Step 1: Start right above the lion's face, and make a few dark lines going upwards. The further they go up the lighter they get. Make the lines reach the oval of fur that we made for the lion. Make sure that the lines seem like they are coming right out of the top of the lion's head. After you make the lines on the top of the lion's head start curving the ends of them. In the areas where the ears are, don't put that much hair. Just throw in a few strands here and there. Now you are going to shade the bottom left side of his face. Shade that part darker then the rest of the body. Then draw some lines coming out of the shaded part. Draw lines coming from the oval of fur, and connect it to the shaded part on the left side of the lion's face. Draw the lines from the top left side of the face, and connect it to the lines of the shaded part. Once you are done drawing the fur to the shaded area, take out your eraser, and start erasing some curves on the lions face. This will make it seem like the lions hair is not perfect, and looks messy. Draw small little lines on the lions ear so he would have fur on his ear. Then shade in the lion's ear lightly. Make sure that the shade looks like fur, so make it have some lines.

Step 2: On the lion's face repeat what you did to the right side. Make sure that the lines aren't the same, make all the lines messy and different. This is so the hair will actually look like lion's hair. Make the bottom part of the lion's face darker, so it would seem like the hair is coming out of it. To draw the lion's body, just draw one line going to the left, and one going downwards. Shade this in, so it would seem like it has hair on its body. Now you are going to start shading in some of the hair. On some lines, darken the middle. Darken the top few strands.

Step 3: Darken the ends of all the bottom hair strands to make it look like it is against the body. Draw a few more strands coming out of all the fur, so the lion's hair would seem imperfect. Finally, this is optional, grab a small paint brush and some white paint and paint a few strands for whiskers.

Step 1: Start right above the lion's face, and make a few dark lines going upwards. The further they go up the lighter they get. Make the lines reach the oval of fur that we made for the lion. Make sure that the lines seem like they are coming right out of the top of the lion's head. After you make the lines on the top of the lion's head start curving the ends of them. In the areas where the ears are, don't put that much hair. Just throw in a few strands here and there. Now you are going to shade the bottom left side of his face. Shade that part darker then the rest of the body. Then draw some lines coming out of the shaded part. Draw lines coming from the oval of fur, and connect it to the shaded part on the left side of the lion's face. Draw the lines from the top left side of the face, and connect it to the lines of the shaded part. Once you are done drawing the fur to the shaded area, take out your eraser, and start erasing some curves on the lions face. This will make it seem like the lions hair is not perfect, and looks messy. Draw small little lines on the lions ear so he would have fur on his ear. Then shade in the lion's ear lightly. Make sure that the shade looks like fur, so make it have some lines.

Step 2: On the lion's face repeat what you did to the right side. Make sure that the lines aren't the same, make all the lines messy and different. This is so the hair will actually look like lion's hair. Make the bottom part of the lion's face darker, so it would seem like the hair is coming out of it. To draw the lion's body, just draw one line going to the left, and one going downwards. Shade this in, so it would seem like it has hair on its body. Now you are going to start shading in some of the hair. On some lines, darken the middle. Darken the top few strands.

Step 3: Darken the ends of all the bottom hair strands to make it look like it is against the body. Draw a few more strands coming out of all the fur, so the lion's hair would seem imperfect. Finally, this is optional, grab a small paint brush and some white paint and paint a few strands for whiskers.

Sunday, November 1, 2015
Fourth Drawing Blog: How to Draw a Lion Part 1
Hi everybody! This week I'll be working on part 1 of a lion drawing. I hope you enjoy it.
Step 1: Draw a two and a half inch square, and cut it in half twice so there are four smaller squares. Then around that you are going to draw a five inch box. Make sure that the bottom of the five inch box is part of the bottom of the smaller box. Draw a small line in between the boxes. Now you are going to draw a small heart that has no tip. Make sure the two lines of the heart end at the crossing of the smaller boxes. Then you are going to draw two circles both on opposite sides of the two squares. After that you are going to draw a circle around that circle and draw two small squares protruding from it: one from the bottom, and one from the left and right. You are then going to draw a flat "v" from the two bottom boxes. In the middle of that "v" you are going to draw a thick "t". You are then going to draw two big curves from one side of the lions face to the other. Right under it you are going to draw a small oval. Make sure that the bottom of the oval seems fury, so draw protruding lines out of it.

Step 2: Draw a lot of small dots on the lion's face right above the two curves. Now you are going to draw two upside down "c"s with fur in front of it. Now draw a big oval of fur around all of this to make the lion's face. Darken the area around the eyes. Then draw a dot for the pupil and shade the eye in lightly. Then around the eye, draw some fur, brushing multiple line outwards away from the eye. Do this to the other eye. Darken the nose now and put some light dots on it. Shade very lightly around the nose to the mouth.

Step 3: Now you are going to shade in the mouth, so it would be very dark. Draw a few lines coming from the mouth going to the fury oval, so it would seem connected. Shade in the lion's face so that the sides of his face is darker then the middle. Lightly shade in the middle and darken the areas around his eyes. Make a dark line from the top of the heart that we drew in the beginning, that ends at the bottom of the eyes.

Step 1: Draw a two and a half inch square, and cut it in half twice so there are four smaller squares. Then around that you are going to draw a five inch box. Make sure that the bottom of the five inch box is part of the bottom of the smaller box. Draw a small line in between the boxes. Now you are going to draw a small heart that has no tip. Make sure the two lines of the heart end at the crossing of the smaller boxes. Then you are going to draw two circles both on opposite sides of the two squares. After that you are going to draw a circle around that circle and draw two small squares protruding from it: one from the bottom, and one from the left and right. You are then going to draw a flat "v" from the two bottom boxes. In the middle of that "v" you are going to draw a thick "t". You are then going to draw two big curves from one side of the lions face to the other. Right under it you are going to draw a small oval. Make sure that the bottom of the oval seems fury, so draw protruding lines out of it.

Step 2: Draw a lot of small dots on the lion's face right above the two curves. Now you are going to draw two upside down "c"s with fur in front of it. Now draw a big oval of fur around all of this to make the lion's face. Darken the area around the eyes. Then draw a dot for the pupil and shade the eye in lightly. Then around the eye, draw some fur, brushing multiple line outwards away from the eye. Do this to the other eye. Darken the nose now and put some light dots on it. Shade very lightly around the nose to the mouth.

Step 3: Now you are going to shade in the mouth, so it would be very dark. Draw a few lines coming from the mouth going to the fury oval, so it would seem connected. Shade in the lion's face so that the sides of his face is darker then the middle. Lightly shade in the middle and darken the areas around his eyes. Make a dark line from the top of the heart that we drew in the beginning, that ends at the bottom of the eyes.

Sunday, October 25, 2015
Third Origami Blog: Origami Boomerang
Step 1: Get a normal sheet of printer paper, and cut it in half lengthwise. Now get one of the sheets of paper, and fold it in half lengthwise. Now you are going to unfold that, and bring both sides of the paper to the newly created line. Now fold the paper in half. Make sure that the part you just folded is in the inside. Then you are going to fold the corners on the folded side to the line, and unfold it. Finally you are going to do a forward fold folding the corners inside the paper.


Step 2: Unfold the paper so it looks like a large rectangle again. Now you are going to take one of the folded sides, and unfold it. (It matters which hand you use, in my case I'm unfolding the right side, because I am right handed.) Fold the paper in half away from you. Then flip the paper over, and fold each side of the diamond, so they will fold easily. Flip the paper back over and, get the diamond part and squish it to the side, so it looks like it collapsed. Finally get the bottom portion of the unfolded piece, and fold it back to the center.


Step 3: Fold the bottom portion of the other side of the boomerang, so it overlaps the side we just folded. Then fold the corner on the top portion, so it over laps the top of the portion on the other side. Now unfold both of the bottom portions of the boomerang. Then you are going to fold the left side down and then right side, making sure the right side goes into the pocket on the top of the left side.

Step 4: On each end of the boomerang open the ends and fold the tips to the middle. Then do a forward fold on only one of the corners on each side. Then grab the other folded corner, and fold it into the pocket that the forward fold made for the other corners. This should give the boomerang a "point". Now you are done with your origami boomerang. To throw your boomerang grab it in the middle making sure that the diagonal part is facing upwards, and that your index finger is at the point of the diagonal while you thumb is right under it. Happy throwing.


Step 2: Unfold the paper so it looks like a large rectangle again. Now you are going to take one of the folded sides, and unfold it. (It matters which hand you use, in my case I'm unfolding the right side, because I am right handed.) Fold the paper in half away from you. Then flip the paper over, and fold each side of the diamond, so they will fold easily. Flip the paper back over and, get the diamond part and squish it to the side, so it looks like it collapsed. Finally get the bottom portion of the unfolded piece, and fold it back to the center.


Step 3: Fold the bottom portion of the other side of the boomerang, so it overlaps the side we just folded. Then fold the corner on the top portion, so it over laps the top of the portion on the other side. Now unfold both of the bottom portions of the boomerang. Then you are going to fold the left side down and then right side, making sure the right side goes into the pocket on the top of the left side.

Step 4: On each end of the boomerang open the ends and fold the tips to the middle. Then do a forward fold on only one of the corners on each side. Then grab the other folded corner, and fold it into the pocket that the forward fold made for the other corners. This should give the boomerang a "point". Now you are done with your origami boomerang. To throw your boomerang grab it in the middle making sure that the diagonal part is facing upwards, and that your index finger is at the point of the diagonal while you thumb is right under it. Happy throwing.

Subscribe to:
Posts (Atom)